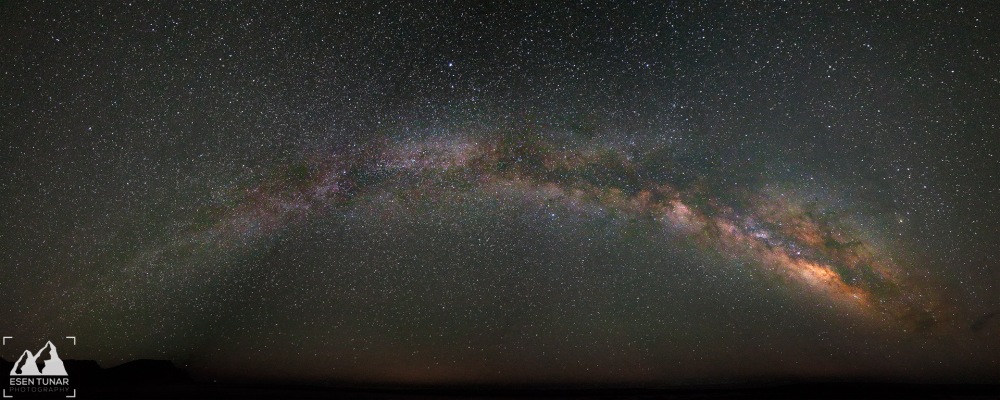
It all started on a warm summer evening. I was standing at a pitch black beach in Karpaz Peninsula (North Cyprus) and staring at the sky. I took few images of the Milky Way using a Samyang 14mm lens. I went home and stitched images together to create this panorama. It is a 9 image panorama of the Milky Way extending all the way from North to South. Click on the image to see it larger.
I bought my first SLR with the idea of taking pictures of the Milky Way, but it took me almost 3 years to have a go at it. I was quite amazed with my first attempt. I wanted to capture all the dust clouds visible in the galactic core and there they were all visible with a bright orange glow of the galactic core.
After a year so, I began to think about using a longer lens to capture the Milky Way in greater detail. I had sigma 50mm f1.4 lens that I could use. It was both longer than the Samyang’s 14mm focal length but also much faster at f1.4 – gathering 4 times as much light than Samyang’s f2.8. So next summer I had a go at it again. Unfortunately I miscalculated the length of exposure and all my images had startrails in them – and I only noticed this on the computer screen when I came home.
Roll on summer of 2013.. Another Cyprus holiday, another go at the Milky Way. This time I made sure I used correct exposure. I took 10s exposures at f1.8 (to reduce vignetting and make sure image was sharp across the frame) and ISO 3200. And the result is the following picture. Click on the image to see it larger.
This is made up of 37 different images stitched together to create a 14000 x 4000 pixel photo of the Milky Way extending all the way from North to South. The detail in this image was incredible compared to the previous image. And at the time I thought this was the best I could do – and I won’t be able to top it up.
But later in 2013, I bought an Astrotrac Tracking Mount which lets you have longer exposures without startrails. Theoretically I could expose as long as I wanted, but after my first attempt I realised that the atmospheric light pollution becomes too much after after certain exposure length. So I settled with 25s exposures at f2.0 and ISO 3200. I had my 3rd attempt at capturing the Milky Way in summer 2014. I ended up taking 47 images to capture the Milky Way from North to South. Click on the image to see it larger.
Stitching the 47 images together created a 15000 x 6000 pixel photo. As you can see the length is roughly the same as the previous attempt but I managed to capture more of the sky around it, creating a bit more balanced framing (The previous image had a ratio of 3.5:1 whereas this one has more manageable 2.5:1).
When I finished processing this image, I was very satisfied with the result – ridiculous amount of detail along the Milky Way with gas clouds clearly defined across the whole frame and different Messier Objects visible and identifiable. And At the time, I decided I wouldn’t attempt to better it.
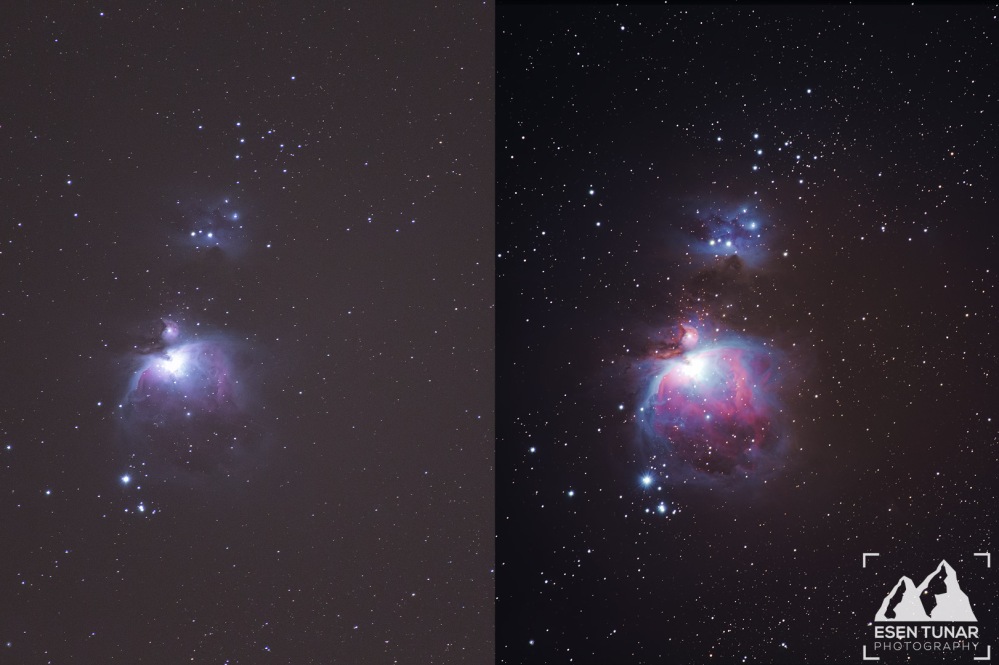
But obsession is a funny thing.. In winter 2014, I borrowed a tamron 150-600mm lens from a friend for a trip to Cyprus. I used it to capture Orion Nebula. Because nebulae are very feint, photographers use stacking to improve signal to noise ratio and get more detail from the picture. I took 80 images of the Orion Nebula and used a stacking software to combined them into one. The following picture shows a single image compared to the final stacked image.
The difference stacking makes made me consider trying it with Milky Way – but because of the effort involved I didn’t want to capture the whole length of Milky Way. So at first, I took few images of the galactic core to see what kind of improvement I get by stacking. This final picture was made up of 30 images stacked together. In addition to stacking, I also used ISO 6400 and 60s exposures at f2.8. The additional detail was clearly visible. The dust clouds became even more defined and stood out against the sky.
After seeing what the stacking can do for the Milky Way, I decided to expand it and try to capture the whole length of the Milky Way… again.
This proved to be quite time consuming and difficult. It was already difficult enough to ensure I didn’t miss any section while doing the previous panoramas, but with stacking this became even more difficult due to duration of the exposures. The Milky Way doesn’t stand still in the night sky and keeps moving as earth rotates, so when I changed framing or reset the tracking mount, I had to figure out where I was before.
Also, each frame took about 45 minutes – 10-15 minutes of adjusting the framing, making sure I am at the right section and 30 minutes of shooting (30x60s exposures).
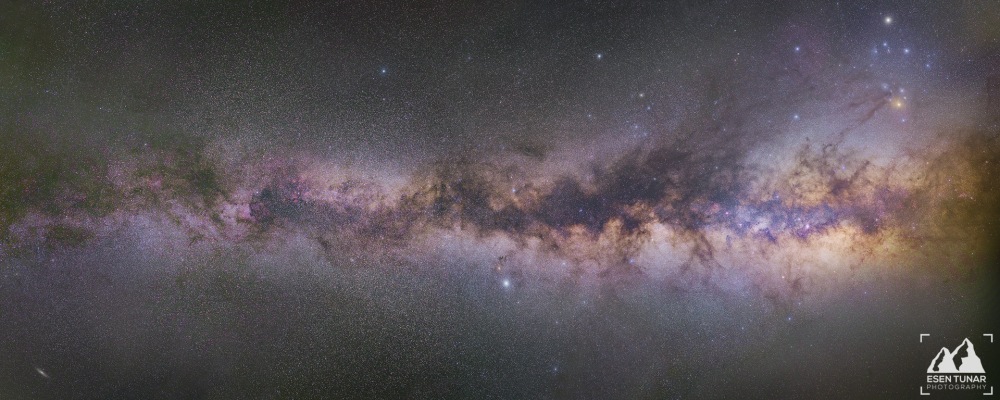
I spent 4 nights to capture the different sections of the Milky Way. I decided to only 15 exposures instead of 30 for the outer sections as there wasn’t as much detail to extract. In the end, I took 720 images. Final image is made up of 28 different sections. Despite having less sections than previous panoramas, it was larger – 18237 x 7295 pixels (133 megapixels). As always click on the image to see it larger.
Stitching stacked images also proved difficult as it was hard to ensure correct colour balance across all 28 images. And there are few flaws with the surrounding stars, but luckily they are not visible.
In 4 years, I moved from a 9 image (6250 x 2500 pixel) panorama to a 720 image (18237 x 7295 pixel) stacked panorama. People usually say it’s not about what gear you have and I agree with that but sometimes that’s not the case. This “evolution” shows you may need both the right gear and the experience to get the image you are after. I needed the 50mm lens to get a more detailed image of the Milky Way compared to the 14mm… I also needed the tracking mount to improve the exposure length to capture more detail for the 3rd panorama. But it wasn’t the equipment that got me from the 3rd to final image.
So was this all worth the trouble? I don’t know, you be the judge. I like astrophotography, and hopefully one of these will be on my wall soon as a giant canvas. I captured all these images during summer in Cyprus, so it’s usually very pleasant sitting on a beach and staring at the stars all night – I am not sure if I would have gone to this much trouble if I were doing it somewhere else.
Is this the final form? I guess at the moment, yes. But I said the same thing after I was finished with the previous versions as well. I suppose evolution never stops..


Persistance pays off in a major way here. I know just how complex things can get when trying to use astronomical tracking mounts, polar alignment being the most irritating aspect of the Astrotrac in particular…. You have got a lot further than I have with the concept – well done Esen.